
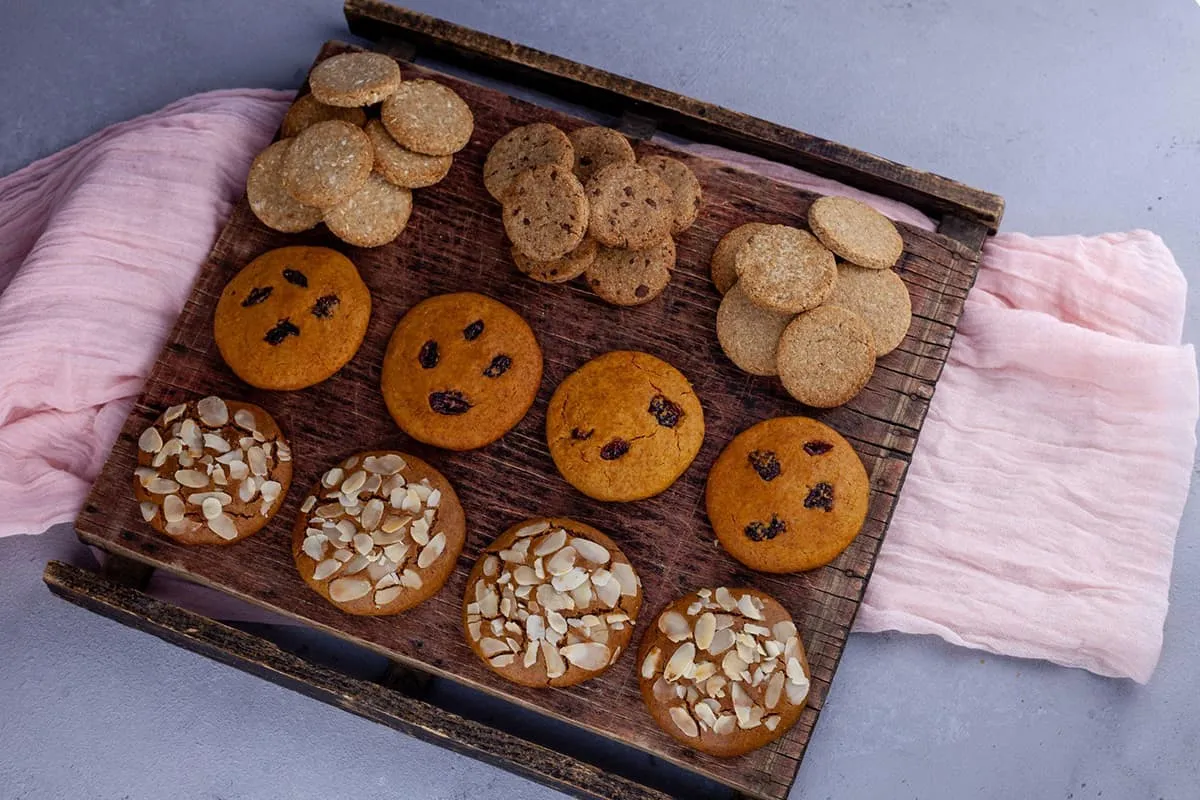

Ever pulled a batch of cookies out of the oven only to find they've spread into a flat, gooey mess? I've been there, and I know how frustrating it can be. But don't worry, I've got the scoop on how to revive and prevent flat cookies.
Understanding why cookies spread can help you avoid this baking blunder. From the type of ingredients used to the temperature of your dough - there's a lot that goes into the perfect cookie. Stick with me, and I'll share my top tips and tricks to keep your cookies from falling flat.
Why Do Cookies Spread?
Spreading happens when the fat in your cookie dough melts in the oven. If there's too much liquid in your dough, it'll encourage more spread. But hey, don't just point fingers at the butter. There are a couple of other culprits involved.
One of them is sugar. What did sugar ever do, you ask? Well, sugar draws in liquid. If you've got too much sugar in your dough, it'll pull in liquid, making your dough more fluid, and a more fluid dough means more spread.
Temperature comes in next on the line. Warm dough spreads faster than cold dough. So, if you're not chilling your dough before baking it, start. It'll do a world of difference.
Did you know the type of baking sheet you use can also impact how much your cookies spread? Dark-colored baking sheets absorb more heat than lighter ones, and the hotter your sheet, the quicker your cookies will spread.
And then, the type of flour used in your cookie dough can also be a triggering factor. Lower-protein flours (like cake flour) make for a more tender, spreadable dough; higher-protein flours (like bread flour) provide more structure, and thus less spread.
Common Causes of Flat Cookies
Moving forward, let's identify some widely accepted causes of flat cookies. Recognizing these factors can mark the starting point towards preventing this common cookie catastrophe.
Primarily, the butter content in your cookie dough plays a crucial role. It's well known that butter is a fat, and fats can cause your cookies to spread while in the oven. My advice is to always check whether your butter is neither too cold, nor too hot, but just right before mixing it into your dough.
Another significant factor can be the oven temperature. Believe it or not, an oven that's not hot enough can be the culprit behind your flat cookies. If the oven's not hot enough, the dough will begin to spread before it starts to set. Thus, leading to cookies that are thin and crispy, instead of thick and gooey.
Let me tell you something interesting. The amount of flour used also holds importance when it comes to the final texture of your cookies. The type of the flour selected can cause either cakey or flat cookies. High-gluten bread flour tends to make cookies tougher and cakey, while low-gluten cake flour often leads to crumbly cookies. When going for that perfect balance, I'd suggest sticking with all-purpose flour.
Tips for Reviving Flat Cookies
Have you ever tried baking a batch of delicious cookies, only to find them ending up flat and lifeless? Don't fret! There's still hope for those underbaked, spread-out goodies. In this section, we'll discuss some effective strategies to bring life back to those flat cookies.
Toasting Shriveled Cookies
Firstly, we have the toasting method. Grab your flat cookies, put them on a baking tray, and place it in the toaster oven. Make sure it's set to a low heat setting to avoid burning them. You want the cookies to lightly toast and not become overly crispy. This method just gives them a bit of texture and helps them firm up - the perfect way to combat the flatness.
Filling in the Flatness
Next, consider incorporating a filling. Sometimes, a flat cookie can be transformed into a beautiful, well-structured sandwich cookie. Consider compounds like butter cream, jam, or even marshmallow fluff as your filling. It's not just about aesthetics - the filling adds another element of texture and a new layer of flavor to turn those cookies into true delicacies.
Bread to the Rescue
Last but not least, we have the 'old bread' trick. Simply place a slice of bread in the container with your cookies. Trust me on this one - it's a fantastic trick with proven results! The dry cookies absorb some of the moisture from the bread, making them softer and puffier. Usually, leaving the bread in overnight is the best way to ensure that the cookies have absorbed as much moisture as possible. Worth giving it a shot, don't you think?

Preventing Flat Cookies
Preventing flat cookies is as much a science as it is an art. You're dealing not just with taste and texture, but some very specific, very necessary chemical reactions. Proper temperature is paramount to total cookie success, as my previous discussions on butter and dough have highlighted. Yet, all the temperature control won’t save your cookies if you don’t nail the ingredient proportions and types.
The right amount of flour is key but overdoing it can dry out your cookies. All-purpose flour tends to strike that balance, providing both structure and chewiness. I'd suggest keeping your dough at the chillier end of room temperature to ensure it stays firm enough on your baking sheet but not so much that it's unworkable.
Delving deeper into butter's role, aside from its delightful gastronomic contributions, it's a primary player in your cookie's spread. Remember, warmer butter equals wider cookies. Starting with properly softened, not melted butter and keeping your dough cool can make all the difference. That perfect point is somewhere around room temperature but slightly cooler, about 65°F (18°C) to be exact.
Baking sheet choice is just as crucial as what’s on it. Darker colored sheets absorb more heat leading to more spread — stick with a lighter colored sheet, and you'll see a significant reduction in cookie sprawl. Understand, this isn't a guarantee, but your results are liable to be much more puffed up and less saucer-like.
To further help control spread, consider refrigerating your dough for at least an hour, overnight if possible. This helps firm up the dough and gives your cookies a head start on setting before that butter has a chance to melt. Oh, and slap that stiff dough onto a pre-warmed baking sheet. Sounds counterintuitive, I know but trust me, you want as much of a head start on the baking process as you can get.
Whether it's toasting them just right or harnessing the power of some old bread, there are a few tricks that can turn cookie catastrophe into dessert delight.
So, there you have it. I've walked you through the ins and outs of why cookies spread and how to prevent it. It's all about the balance of ingredients, the right oven temperature, and the crucial role of chilling your dough. Remember, a well-chilled dough on a warm baking sheet is your secret weapon to prevent cookie spread.
And even if your cookies do go flat, don't despair! I've shared some nifty tricks to revive them, like toasting, filling, or using the old bread trick. With these tips in your baking arsenal, you're now well-equipped to whip up perfectly puffed cookies every time.


There aren't any comments left behind yet you can be the very first to comment!